
Caring for Your Vintage Receiver or Amplifier
A good vintage receiver is one of the best buys in audio. It was built when amplifiers were made to last, it has the warm glow and the solid controls no modern box can match, and with a little care it will play for decades more. This guide covers how to set yours up, how to look after it, and what to do if it ever misbehaves.
It’s written for solid-state (transistor) stereo receivers, integrated amplifiers, and power amp and preamp pairs, which is what nearly every vintage system is built around. Tube amplifiers have needs of their own and aren’t covered here.
The quick start below is the short version. Everything after it goes deeper, and the questions we hear most are at the end.
Quick start
If you read nothing else, read this.
- Brought it home in the cold? Let it warm up first. Leave it at room temperature for a few hours before you plug it in, so any condensation inside can dry off.
- Give it air. Put it on an open shelf, ideally the top one, with nothing stacked on top and a few inches of clear space above and behind. Never cover the vents.
- Make every connection with the power off and the volume all the way down. Turn your sources on first and the receiver last. Turn the receiver off first.
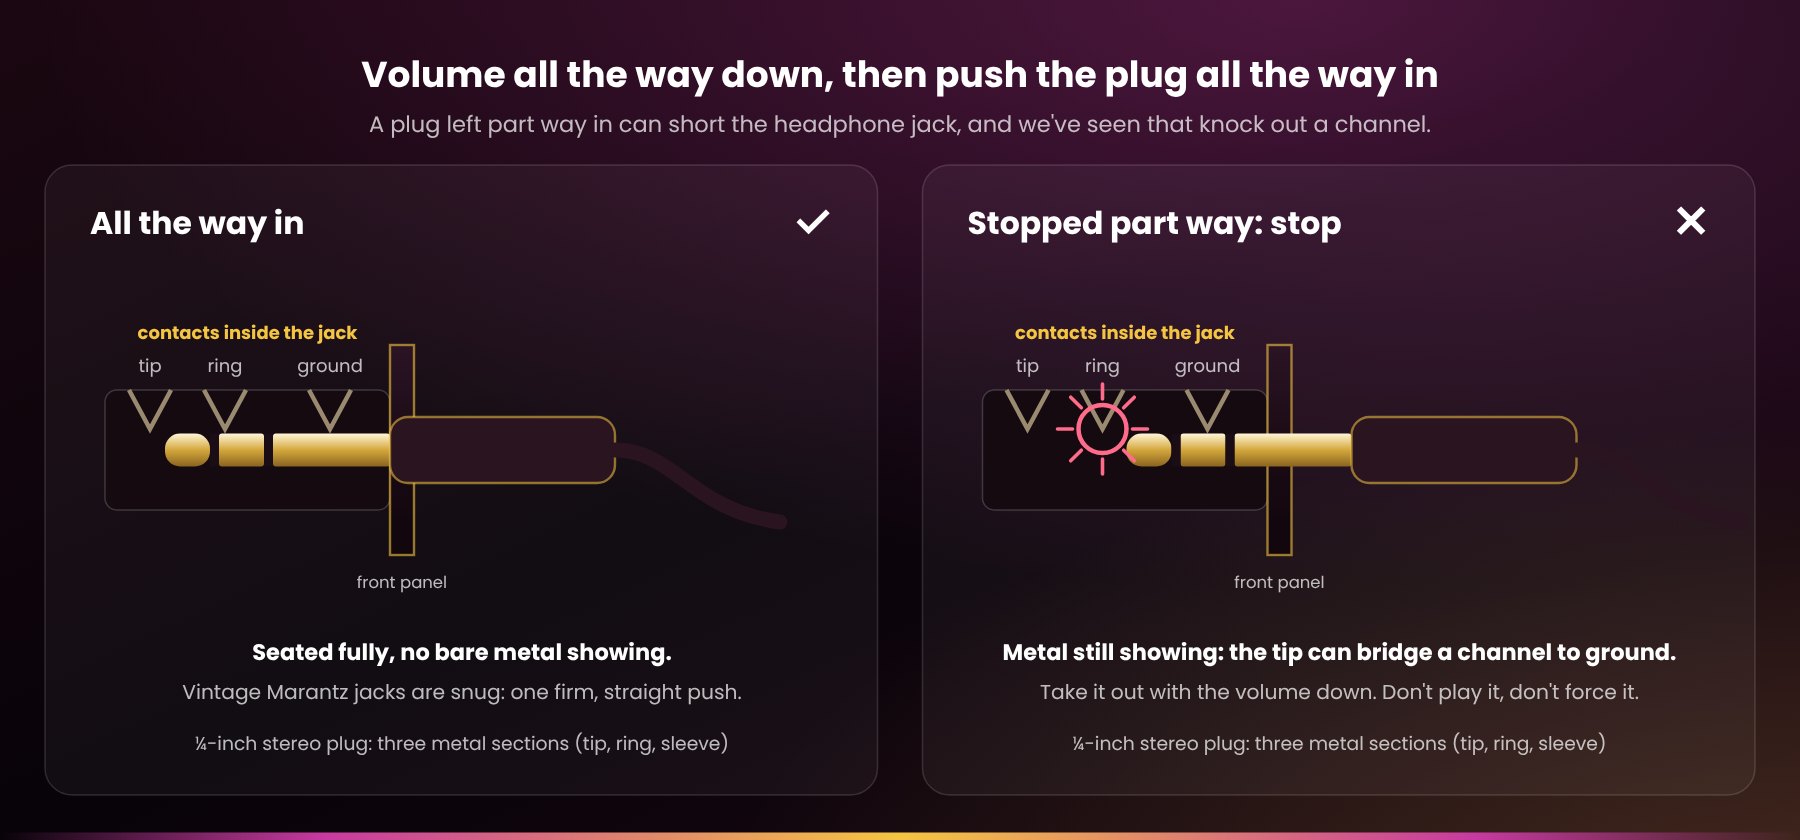
- Headphones: volume all the way down, then push the plug all the way in. A plug left part way in can short the headphone jack, and we’ve seen that knock out a channel. If it won’t seat fully with a firm push, stop and contact us. Don’t play it half in, and don’t force it.
- Wire the speakers carefully. Red to red, black to black, and not one stray strand of copper. Banana plugs or spades make this foolproof.
- Respect the impedance. Most vintage receivers want 8-ohm speakers, especially when you play A and B pairs together. Check the label on the back before you add a second pair.
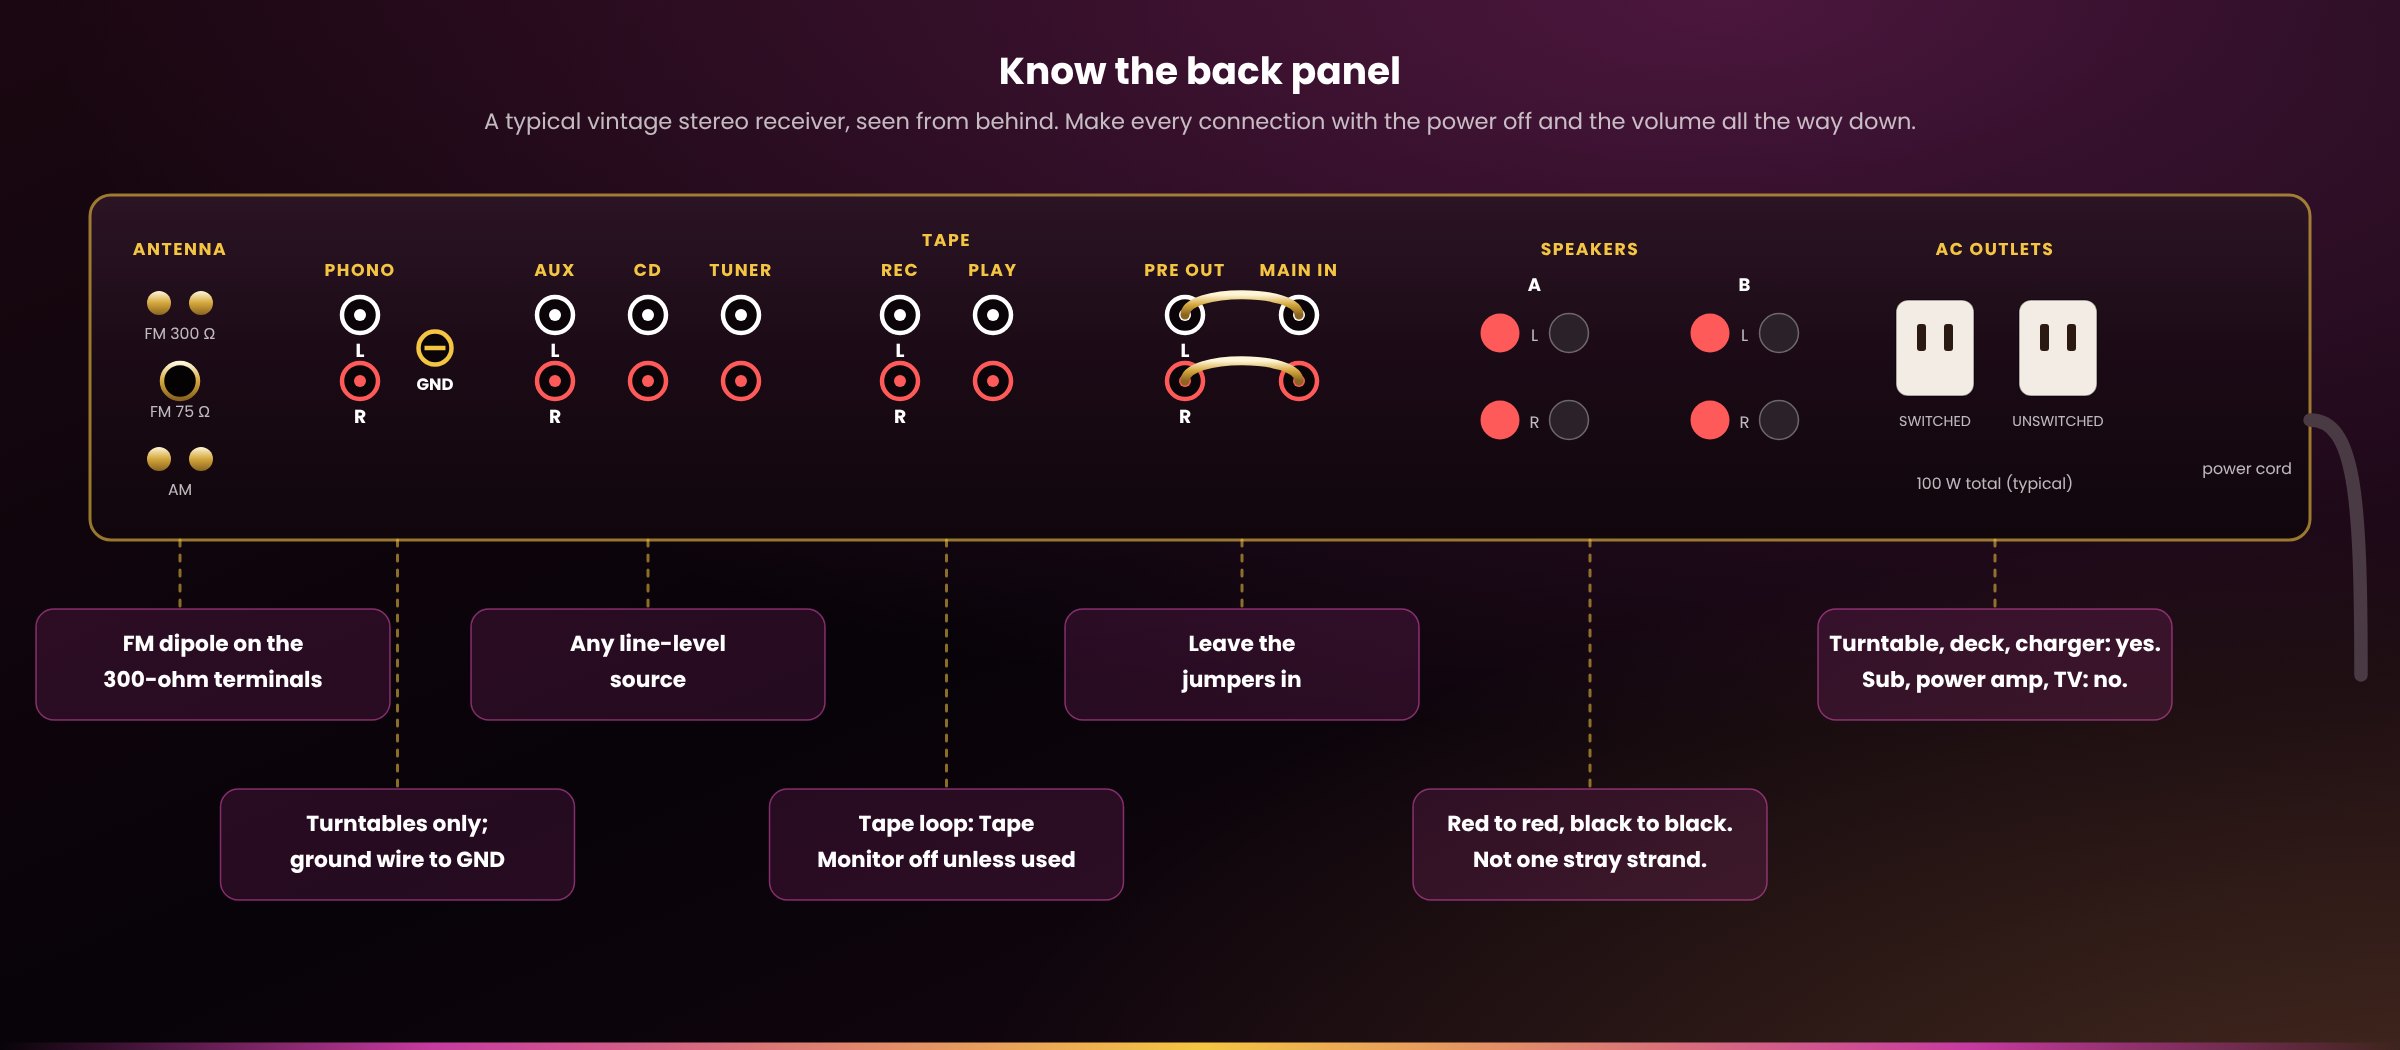
- No sound? Check the buttons before you worry. A pressed-in Tape Monitor button, a speaker selector set to the wrong pair, or missing Pre Out/Main In jumpers cause most “it’s dead” calls we get.
- Turntables into PHONO, everything else into AUX, CD, TUNER or TAPE. Never plug a CD player or streamer into the phono input.
- Expect a click and a few seconds of silence at switch-on. That’s the protection relay doing its job.
- Turn it down at the first sign of harshness. An amplifier pushed into clipping is the most common way we see vintage speakers damaged.
- Use your receiver’s controls regularly. A switch or knob that sits unused is the one that gets scratchy. If one crackles, call us; please don’t spray anything into it.
- Protect its power. Use a good surge-protecting power bar, switch off when the lights dim, and unplug during thunderstorms. Never run a subwoofer, power amp or TV from the outlets on the back of the receiver.
- Know your coverage. Your receiver from us (as-is units excepted) carries our 90-day Bumper-to-Bumper Warranty and our Perpetual Trade-Back Program. If it’s over $500, you can add an Extended Warranty, but only within those first 90 days.
Want it on one page? Download the printable quick start (PDF).
Why your vintage receiver deserves a little care
Most vintage receivers are 35 to 50 years old. The good ones were built extremely well, which is why so many are still playing. But time works on a few parts no matter how well they were made: the contacts in switches and controls tarnish, the electrolytic capacitors that filter and couple the signal slowly age, and the little incandescent lamps behind the dial burn out.
Every receiver and amplifier we sell has been through our bench: tested, cleaned and serviced as it needed, then tested again before it was listed. Our service levels page explains exactly what that involves. Once it’s in your home, though, how you set it up and use it matters more than anything else for how long it keeps going. Most of the avoidable failures we see come down to the same short list: heat, a short circuit at the speaker terminals or the headphone jack, a cable connected with the power on, or an amplifier played into distortion for too long. This guide covers how to avoid each one.
Know your receiver or amplifier
Receiver, integrated amp, or separates?
A receiver is an amplifier, a preamplifier and a radio tuner in one box. An integrated amplifier is the same thing without the tuner. Separates split the job across a preamplifier (the controls and inputs) and a power amplifier (the muscle). Everything in this guide applies to all of them; the radio sections apply only if you have a tuner.
What “watts per channel” means for you
The power rating tells you how loud the amplifier can play before it runs out of clean output. More watts doesn’t mean a louder knob position; it means more headroom before distortion. A 25-watt receiver with efficient speakers can fill a living room; a 100-watt receiver with inefficient speakers may not. What matters is that you never ask it for more than it has (see Volume, clipping and your speakers).
What ages, and what doesn’t
Transformers, chassis, heat sinks and most transistors can last indefinitely. What wears is anything with a moving contact (the volume and tone controls, the input selector, every push button), anything that burns (the dial and meter lamps), and, over many years, the electrolytic capacitors. That’s why the habits below focus on heat, on the controls and on the connections.
Solid-state, so no warm-up ritual
A transistor receiver doesn’t need to warm up before it sounds right, the way a tube amp does. It’s ready as soon as the protection relay clicks in.
Bringing it home
Let it warm up before you plug it in
Carry a receiver from a cold car into a warm house and moisture can condense on the circuit boards inside, just like on a cold glass. Manufacturers’ own manuals tell owners to let the unit sit for an hour or two with the power off, and some say two to three hours. Through a Canadian winter, we’d rather you waited the full three.
Keep the box, or at least know where to get one
If you ever move house or send the receiver in for service, a sturdy double-wall box and plenty of padding protect it. Not sure how? Ask us; we’ve shipped many hundreds of vintage components and we’re happy to share how we pack them.
Those magenta felt feet are ours
We add Radique Audio High Density Felt Pads to the components we sell for a little extra isolation and to protect your furniture. If you’d rather not have them, they peel off carefully.
Remember the remote, if there is one
Most vintage receivers don’t have one. If yours came with one of our pre-programmed universal remotes, take a photo of the front of the remote when it arrives; it records the 4-digit code it was programmed with.
Where to put it
Heat is the enemy. Give it air
An amplifier turns much of the power it uses into heat, and heat is what ages electronic parts fastest. The electrolytic capacitors inside age especially quickly with temperature: as a rule of thumb, their expected life doubles for every 10 °C cooler they run. A few habits keep yours cool:
- Top shelf if you can. Heat rises, so an amplifier belongs on the top shelf of the stand, where its warm air won’t flow around your other components.
- Nothing on top. Never stack another component, a turntable, books or a plant on the receiver. The vents on top are how it breathes, and a turntable sitting on a warm, humming receiver picks up both. (Our turntable care guide explains why the turntable belongs on its own shelf.)
- Leave clear space all round. Modern manufacturers ask for as much as 30 cm above and 20 cm at the sides and back. A vintage receiver in an open stand with a few inches on every side is happy; one squeezed into a closed cabinet is not. If it must go in a cabinet, take the back off or leave the door open while you listen.
- Not on carpet, a bed or a sofa. Many receivers draw air in through the bottom.
- Away from heaters, radiators and sunny windows. Direct sun also fades wood cases and faceplates over time.
Keep it well away from humidifiers
Warm, moist air blowing over electronics works its way into switches and connections and corrodes them. We’ve seen components age years in a single winter next to a humidifier. Put it on the other side of the room and point it away from your gear.
A home that suits a Marantz
If your receiver is a Marantz that came without a wood case, or with a tired one, our master woodworker builds new cases in genuine Ottawa Valley cherrywood veneer: the WC-22 style cabinet ($495) for the 22xx series, and the WC-10 style cabinet ($445). He can also dress many other components in cherry; see Ottawa Valley Cherry Cabinetry. Missing feet? Our replacement feet for Marantz 22xx, 23xx and 4xxx receivers ($49, set of 4) restore the original stance. Already have a cherry cabinet? Our cherrywood cabinet care guide covers it.
Power and protection
Never connect or disconnect anything with the power on
Plugging a cable into a live amplifier sends a loud thump through the system that can damage the amplifier, your speakers or both. Turn the receiver off and the volume all the way down before you touch a single cable. Manufacturers say the same: turn the volume control to its lowest position before you plug the receiver in. Our Short Audio Tip #7 shows the routine.
On last, off first
Turn on your turntable, CD player and other sources first, then the receiver. Turn off in reverse: the receiver first. That keeps the switch-on and switch-off thumps of your other components out of your speakers. If you have a powered subwoofer, it goes on after the receiver and off before it (see our subwoofer care guide).
Turn the volume down before you switch on
It costs nothing and protects your speakers from a surprise if the last thing you played was loud, or if you’ve changed inputs since.
Use a quality surge protector, and know what it doesn’t do
Plug the whole system into one good surge-protecting power bar; one shared bar also helps prevent hum. A surge protector absorbs spikes, including the surge that can hit when power returns after an outage. It can’t protect against outages, blackouts or brownouts themselves, and nothing you plug in protects against a close lightning strike. When the lights dim or a storm rolls in, switch the system off at the bar or unplug it.
Protecting the whole system?
Our Ultralink HDC150 power conditioner ($249) does a power bar’s surge job and more: 3,500 joules of surge protection, filtering that takes noise off the AC line before it reaches your gear, eight outlets in isolated pairs (four of them switched so the system can power up together), and a display of the incoming line voltage so you can actually see a brownout as it happens. For a single outlet, our Ultralink Noir ULN700XR wall-mount surge protector ($65) is the compact option.
The outlets on the back of your receiver
Many vintage receivers have one or two AC outlets on the back panel, marked switched (on only when the receiver is on) or unswitched (always on), each with a wattage limit printed beside it, often 100 W in total. They’re perfect for a turntable, a tape deck, a tuner, or the charger for a Bluetooth adapter. They’re not for anything that draws real power: a subwoofer or power amplifier can exceed that limit, and manufacturers warn against high-wattage appliances or a TV. Plug those into the power bar instead.
Going away for a few days? Switch it off at the bar or unplug it
A vintage receiver switched off at its own power button is usually fully off, but anything plugged in is still connected to every spike on the line.
Connecting your speakers
This is where most amplifier damage happens, and it’s entirely avoidable.
Polarity: red to red, black to black
Each speaker has a positive (+, usually red) and a negative (−, usually black) terminal, and so does each channel on the receiver. Connect positive to positive and negative to negative at both ends, for both speakers. Most speaker wire has a marking on one conductor (a stripe, a ridge, printed text or a copper/silver colour difference) so you can keep track. If one speaker is wired backwards, nothing gets damaged, but the bass goes thin and the stereo image goes vague, as if the sound is coming from nowhere in particular.
Not one stray strand
A single whisker of copper touching the wrong terminal, or the metal back panel, puts a short circuit across the amplifier’s output. Audioholics calls a short at the speaker terminals a guaranteed way to make a receiver or amplifier fail, and its advice is ours: terminate your speaker wire with banana plugs or spades, and if you must use bare wire, strip only as much as you need and twist the strands tight. Check both ends, and check again after you push the receiver back into place.
Use connectors that suit your terminals
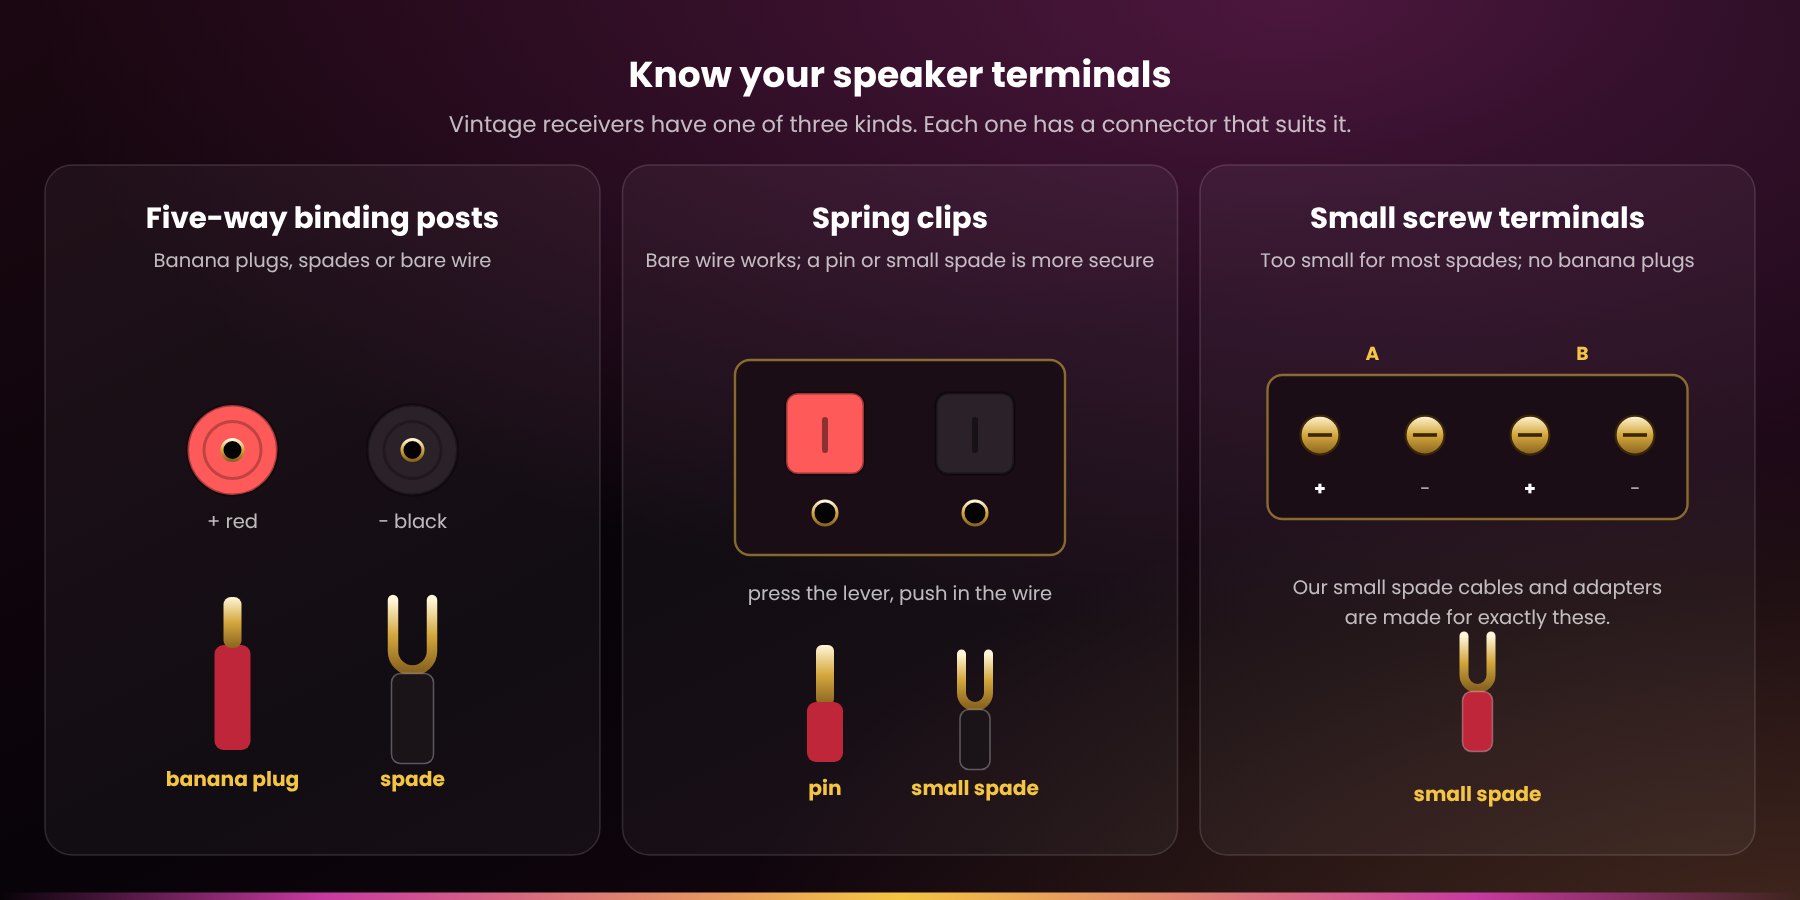
Vintage receivers have one of three kinds:
- Five-way binding posts (round posts with a hole through them) take everything: banana plugs, spades or bare wire. Our gold-plated Radique Audio banana plugs (from $15) and spade connectors (from $15) clamp the wire with two set screws, so there’s no soldering and no stray strands. Our installation guide shows how in a few minutes.
- Spring clips (press a lever, push in the wire) were common on many 1970s and 1980s receivers. Bare wire works, but a pin connector or a small spade is far more secure.
- Small screw terminals were common on many classic Marantz and Pioneer receivers, and they’re too small for most spades and won’t take a banana plug at all. This is exactly what our small spade terminations are for: House CCA cables with a banana plug at one end and a small spade at the other, or pin to small spade (10 ft pair, $90 each), and our small spade adapters ($19), which let a banana plug or heavier cable connect to small screw terminals.
Thick enough wire
Speaker wire that’s too thin for its length wastes power and softens the bass. For the short runs in most rooms, 16 AWG is plenty; longer runs or 4-ohm speakers want heavier wire. Audioholics’ table recommends 16 AWG up to about 20 ft for 8-ohm speakers and 10 ft for 4-ohm, and 14 or 12 AWG beyond that. Our House CCA speaker cables (3, 5 or 7 ft, from $55) come terminated and ready to plug in. Need a particular length, termination or wire? Our Custom Speaker Cable Builder makes them to order, in our house cable or in Kimber Kable, which we’re an authorized dealer for.
Bi-wire speakers
If your speakers have two pairs of terminals, joined by metal straps, either leave the straps in and connect one cable, or remove the straps and use a bi-wire speaker cable (one end has two connectors, the other four). If you remove the straps, connect all four terminals; otherwise half of each speaker goes silent. Tired, tarnished straps? Our Radique Audio Bi-Wire Speaker Bridges ($125, set of 4) replace them.
Impedance, and the A + B trap
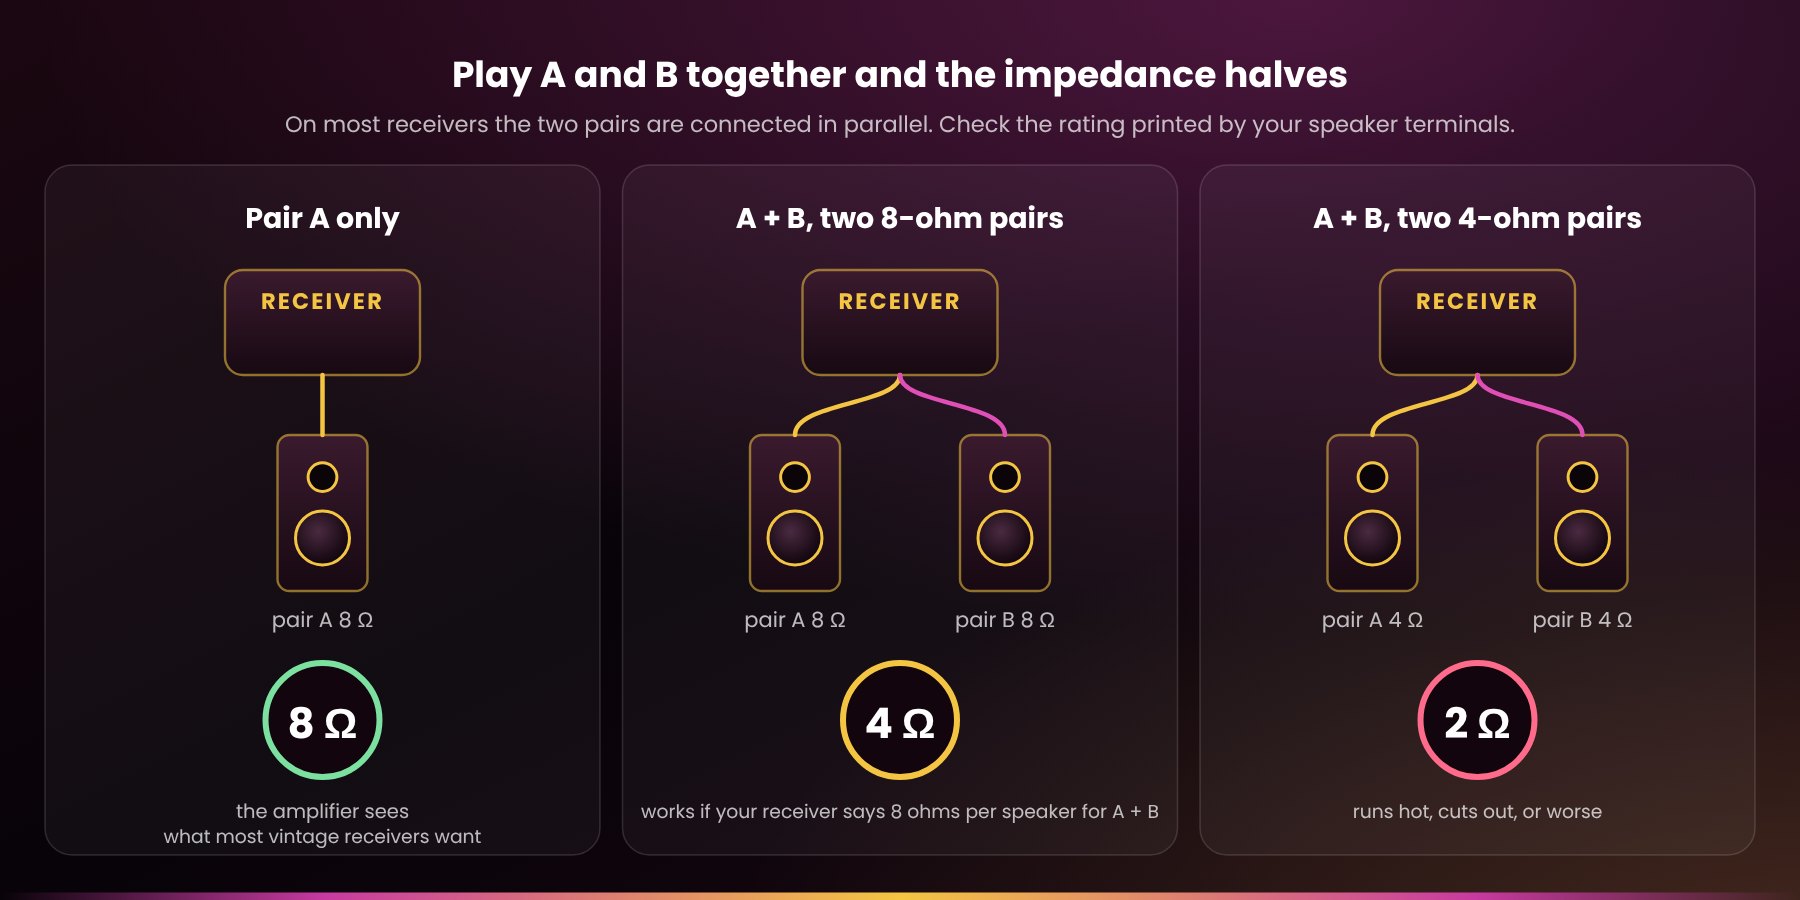
Every speaker has an impedance rating, usually 4, 6 or 8 ohms. Most vintage receivers are designed around 8-ohm speakers, and many are happy with 6. Check the rating printed by the speaker terminals on the back of your receiver.
The speaker selector is where people get caught. Play pairs A and B together and on most receivers they’re connected in parallel, which halves the impedance the amplifier sees: two pairs of 8-ohm speakers look like 4 ohms. That’s why many receivers ask for at least 8 ohms per speaker when A and B play together, even if they accept 4 ohms on one pair. Run two pairs of 4- or 6-ohm speakers at once and the amplifier runs hot, cuts out, or worse. If you’re not sure, use one pair at a time, or ask us before you try.
Getting more from your speakers
Speakers sound their best up off the floor on solid stands, with a little space from the wall. We carry IsoAcoustics speaker isolation stands and a wide range of used speaker stands. Thinking of a new pair altogether? Browse our speakers; we’re always glad to suggest a good match for your receiver’s power and impedance.
Connecting your sources
Phono is for turntables only
The PHONO input is far more sensitive than the others, and it reshapes the sound (the RIAA equalization every record needs). It’s built for the tiny signal from a turntable’s cartridge, nothing else. Plug a CD player, streamer or tape deck into it and you get loud, harsh distortion; Cambridge Audio’s own support page puts it plainly: do not connect a non-phono source to the phono input. The same goes the other way: a turntable with a built-in phono preamp (or one running through an external phono preamp) belongs in a line input such as AUX, not PHONO.
Ground your turntable
If your turntable has a thin separate wire, usually with a spade on the end, it goes under the GND screw on the receiver. It normally minimizes hum, though Yamaha’s own manual notes that once in a while a system is quieter with it disconnected, so try both if you still hear a buzz. Our turntable care guide and Turntable Connectivity FAQ cover the rest. No phono input on your amplifier, or a moving-coil cartridge it can’t handle? A phono preamplifier solves both.
Every other input is interchangeable
AUX, CD, TUNER and the TAPE inputs (often marked PLAY or MONITOR) all accept any line-level source: a CD player, a streamer, a tuner, a tape deck, a DAC or a Bluetooth adapter. The labels just help you remember what’s where.
Modern sources are louder, and that’s normal
Vintage receivers were designed around the sources of their day. A CD player or streamer typically puts out about 2 volts, well above what a 1970s tape deck or tuner delivered, so it’s totally normal for a CD player to sound louder at the same knob position than a record does. You’ll simply use less of the volume knob. If a modern source sounds harsh or distorted even at moderate volume, try turning its own output down, if it has a level control, and tell us what you’re connecting.
The tape loop
The TAPE outputs (REC or OUT) send whatever you’re listening to out to a recorder. The matching inputs come back through the Tape Monitor button, which lets you hear the tape deck instead of the input you’ve selected. That’s handy for checking a recording as it’s made, and it’s also the single most common reason a perfectly good receiver seems to have no sound (see No sound? below).
Better connections, quieter music
The RCA cables that connect your sources carry tiny signals, and cheap thin ones pick up hum and break easily. Our Gold Series RCA stereo interconnects ($29) are well shielded and properly built, with gold-plated plugs that grip firmly.
Add Bluetooth in two minutes
Want to play music from your phone, tablet or computer through your vintage receiver? Our RA-Twin II Bluetooth adapter ($39) plugs into any line input and receives Bluetooth from your device. It’s our best-selling product, made for vintage systems like yours. For the best result, the RA-Twin II Gold Series RX Bundle ($69) pairs it with our heavily shielded Gold Series 3.5 mm to dual RCA cable ($49 on its own). The adapter ships with a basic cable, so the Gold Series cable is an upgrade, not a requirement, but it’s worth it: left connected in receive mode to a receiver that stays on, the adapter switches itself off after a while, and a basic cable can then act like an antenna and bring noise into the amplifier. The Gold Series cable’s heavier shielding stops that, and so does switching the receiver to another input or off when you’re done. Our video Stream Bluetooth to Your Vintage Stereo shows the setup, and the RA-Twin II manual has the details.
Keep it charged from the receiver itself
Our RA-USB multi-port charger ($19) plugs straight into one of the AC outlets on the back of many vintage receivers, so the RA-Twin II stays charged without another wall plug.
Bluetooth headphones, too
The RA-Twin II also transmits. The RA-Twin II Gold Series TX Bundle ($69) connects to your receiver’s headphone jack and sends its sound to wireless headphones, so you can listen to your vintage system without waking the house.
Adding a subwoofer
Most vintage receivers predate subwoofers and have no sub output, but you can still add one. A powered sub with speaker-level (high-level) inputs connects straight to your receiver’s speaker terminals; a receiver with Pre Out/Main In jacks can feed one through a Gold Series subwoofer Y-splitter ($29) so the sub follows your volume knob. Our subwoofer care guide walks through both, and our Short Audio Tip #8 shows the speaker-level method. Browse our subwoofers.
Pre Out / Main In jumpers: leave them in
Many integrated amps and some receivers have a pair of PRE OUT and MAIN IN jacks on the back, joined by small U-shaped metal jumpers. Those jumpers carry the signal from the preamp section to the power amp section, and if they’re removed, no sound will be output. Only take them out to add an equalizer, a subwoofer or a separate power amp, and put them back if you remove that gear. Lost them? A short Gold Series single RCA cable ($19, one per channel) does the job just as well.
Radio: getting the most from the tuner
Your receiver needs an antenna
Vintage receivers don’t have a usable built-in FM antenna, so with nothing connected you’ll get static or nothing at all. The simplest fix is a T-shaped FM dipole on the 300-ohm terminals: our FM dipole antenna ($19) has spade connectors made for them. Spread it out in the shape of a T, then change its direction and position while you listen until the station is clear, and fix it there, ideally high on a wall.
Want more stations?
An attic or outdoor antenna makes the biggest difference of all. There’s an old saying among radio enthusiasts that a low-end tuner with a good antenna will outperform a high-end tuner with a crummy antenna. Outdoor antennas usually connect with coaxial cable to the 75-ohm terminal.
AM needs its own antenna
Many receivers have a swivelling AM bar antenna on the back; others need a loop antenna or a length of wire on the AM terminal. Turn the bar or the loop for the best reception.
Hiss on a weak station?
Press MONO (or turn off FM stereo). A weak station sounds much quieter in mono, at the cost of the stereo image.
A dial that’s slightly off is normal
On a mechanical dial, a station can sit a fraction off its printed frequency. Our bench passes a tuner when it’s within about half a degree of a reference station, around 0.5 MHz on FM; tune by ear or by the signal meter rather than by the printed number.
Using it well
Volume, clipping and your speakers
Every amplifier has a limit. Push past it and the amplifier “clips”: it flattens the tops of the waves and sends harsh, distorted power to your speakers, much of it as high-frequency energy aimed straight at the tweeters. It sounds counterintuitive, but it’s far easier to damage a pair of speakers with an underpowered amplifier that’s frequently driven into clipping than with one that has power to spare, and a clipping amplifier can burn out a speaker rated for more power than the amplifier. Learn what your system sounds like when it’s straining (harsh, edgy, crunchy, the bass going flat and congested) and turn it down at the first sign. If you’re often near that point, you need more efficient speakers or a more powerful amplifier, not more volume. Watch our Short on the loudness trap to see why louder fools our ears.
An amplifier with a problem can hurt your speakers
If one channel crackles, cuts in and out, or makes static, stop and call us. An amplifier misbehaving that way is very likely to damage the speakers connected to it, and it’s an easy fix at the bench before it becomes an expensive one.
Start with the tone controls flat
Set bass and treble to their middle position (often a detented click), and the balance to the middle too. Then adjust to taste. Some receivers also have a “tone defeat” or “direct” switch that bypasses the tone circuits altogether.
The loudness button
Our ears hear less bass and treble at low volume, so the loudness button boosts them when you listen quietly. Use it at low volume and switch it off as you turn up. Our Short Audio Tip #5 explains.
Filters and mono
A LOW (subsonic) filter trims rumble from warped records; a HIGH filter softens hiss from old recordings or weak stations. Leave both off unless you need them. The MODE or MONO switch is for mono records and weak stations.
The speaker selector
Use A, B or both as your setup allows (and see the impedance note above). Set it to OFF to listen on headphones only.
Headphones
Most vintage receivers have a ¼-inch stereo jack; a phone-style 3.5 mm plug needs an adapter. Some amplifiers mute the speakers when headphones are plugged in; on most vintage receivers, you set the speaker selector to OFF instead.
Plug in with the volume down, and all the way in
This one matters more than it looks. As a plug slides into the jack, its tip passes across the other contacts, and for a moment it can bridge an amplifier channel to ground. Headphone-amp makers tell owners to turn the amp off or all the way down before plugging in or unplugging, to avoid short-circuiting it, and Luxman’s manual warns that plugging in with the volume up registers as a short circuit. On most vintage receivers the headphone jack is fed straight from the power amplifier, so a plug left part way in, with music playing, can short a channel’s output to ground and damage the jack, the amplifier or both. We’ve seen exactly that: a plug that stopped part way in on a vintage Marantz, then a jack that no longer played the left side.
- Turn the volume to zero before you plug in or unplug, every time.
- Push it home in one firm, straight movement. The jacks on vintage Marantz receivers are snug, and a good plug can need a firmer push than a modern jack, but it should then sit fully in with no bare metal showing.
- If it stops part way, stop. Take it out with the volume down, and check you’re using a ¼-inch stereo plug (three metal sections, not two) or a solid, well-made adapter; a loose or poorly sized adapter is the usual culprit.
- Never play it part way in, and never force it past a hard stop. If a good plug still won’t seat fully, contact us. The jack can be checked and serviced on our bench.
- Only one side playing? Stop using the headphone jack and contact us; don’t keep plugging in to test it.
That click at switch-on is a good sign
Most vintage receivers wait a few seconds after you switch them on, then click as a relay connects the speakers. That delay keeps the switch-on thump out of your speakers, and the relay is designed to delay closing until any DC surges at the outputs have settled. On larger receivers it can take 10 to 15 seconds. If yours starts taking much longer than it used to, or clicks in and out while playing, let us know.
Meters and lamps
Signal and power meters are for fun and for tuning. If a lamp goes out, nothing is wrong with the sound; see Lamps and lights below.
Everyday care
Dust with a soft, dry cloth
A microfibre cloth is ideal. Don’t spray cleaner on the receiver or anywhere near it; manufacturers warn not to clean with chemical solvents, which can damage the finish. The lettering on a vintage faceplate is printed on, and household cleaners can lift it. The dial glass and meter windows scratch easily, so wipe them gently, with the cloth barely damp at most. For a wood case, see our cherrywood cabinet care guide; the same gentle approach suits original walnut veneer.
Keep the vents clear
Dust, pet hair and cooking grease build up in the vents and on the parts inside, and they hold heat in. Keep the top clear, dust around the vents now and then, and keep the receiver out of the kitchen.
Use every control now and then
The volume, balance and tone controls, the input selector and every push button work by sliding metal contacts, and contacts that sit unused tarnish. Every few weeks, with the volume turned down, turn each knob end to end a few times and press each button in and out. It takes a minute and keeps them quiet.
If a control crackles, call us; please don’t spray it
A scratchy volume control or an input that cuts in and out usually just needs cleaning, but it has to be done with the right product, in the right place, by someone who knows the part. Among technicians, DeoxIT is usually recommended and WD-40 is not, and spraying cleaner in through the front rarely reaches where it needs to go. Cleaning and deoxidizing every control and switch is part of every amplifier service on our bench.
Lamps and lights
Dial and meter lamps burn out, and they run hot
Most vintage receivers light their dials with small incandescent bulbs. They burn out with age, and over the years their heat can cook the plastic lamp holders and the dial paint; open a well-used Marantz and the white plastic around the lamps is often melted from the heat of the bulbs.
Our LED re-lamping
We can replace every lamp in your receiver with LEDs for $95 plus HST. LEDs run far cooler, use a fraction of the power and last much longer, so you won’t be opening the receiver for bulbs again. Want a different look? We’ll re-lamp in any colour combination you like for $145 plus HST. (Replacing a blown bulb or two is already part of our standard service; a full re-lamp replaces them all at once.) If you’re shipping the receiver to us for re-lamping, the shipping both ways is yours.
The colour you saw is the colour you get
Dial colours vary from model to model and lamp to lamp. The colour shown in our listing photos is how that receiver is lit, and it isn’t a fault.
Warning signs and troubleshooting
No sound?
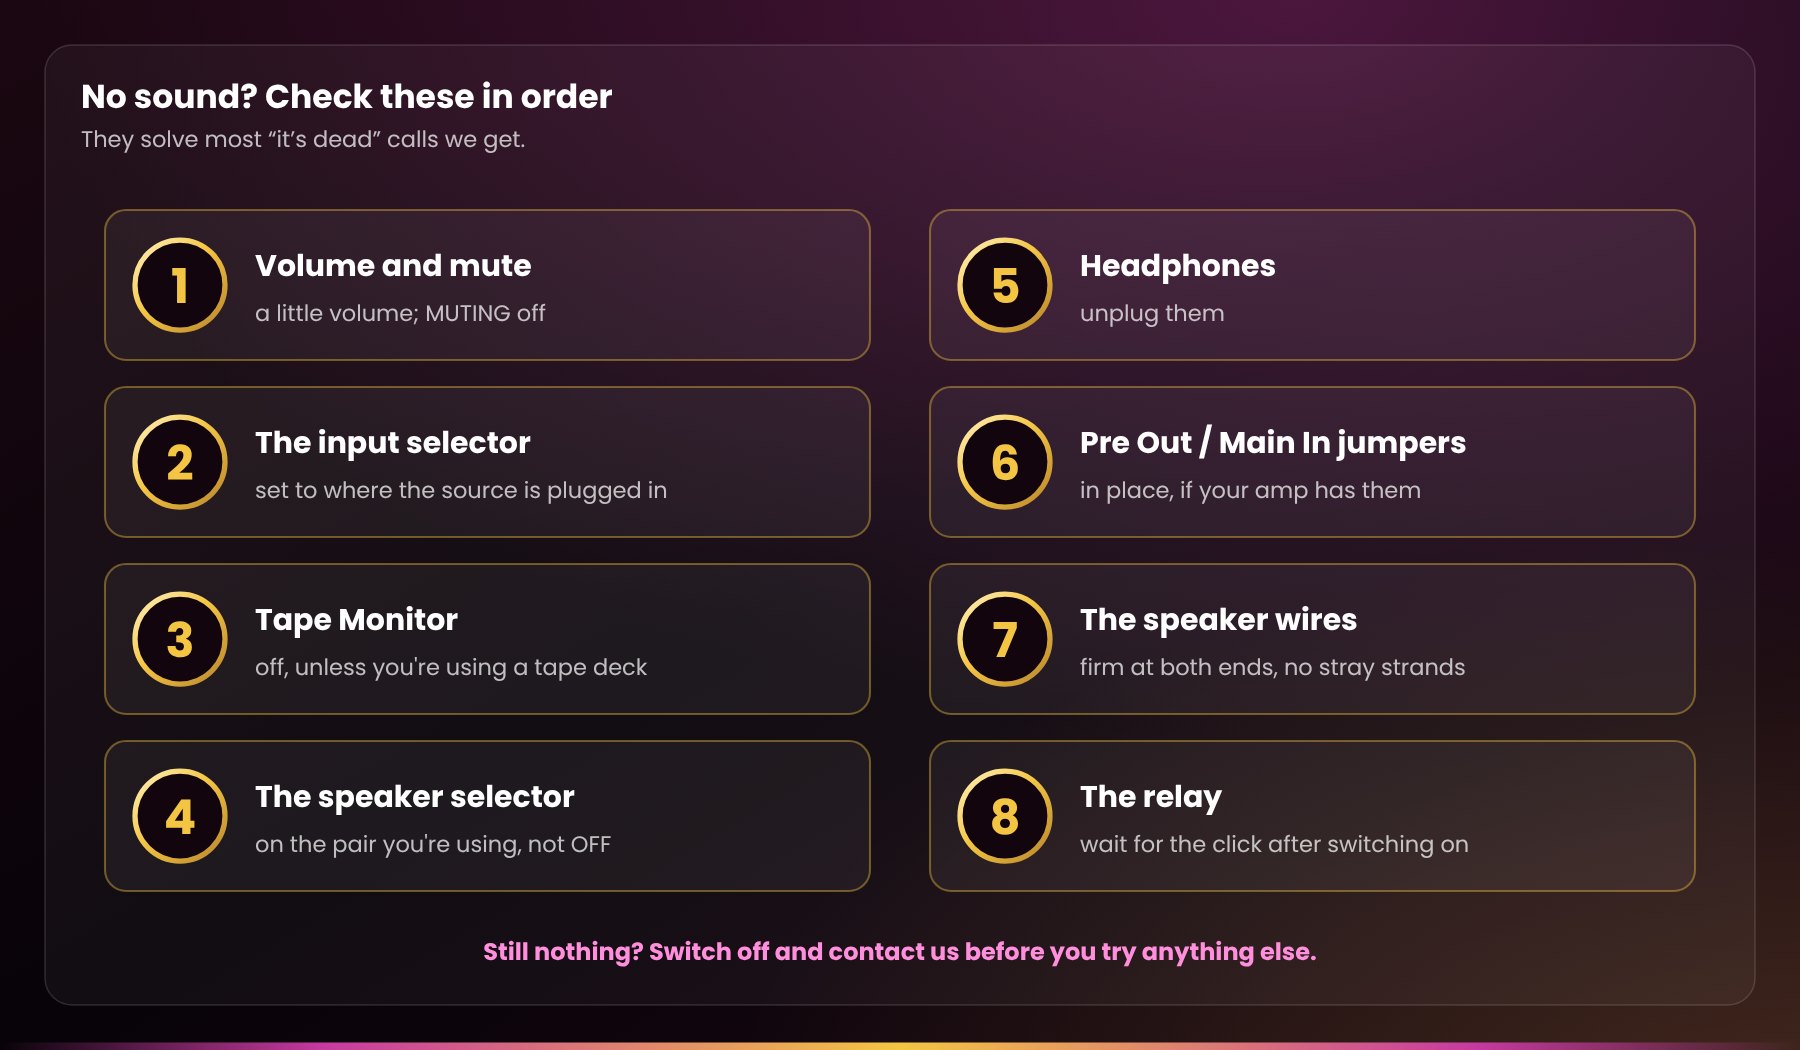
Before you worry, check these in order. They solve most “it’s dead” calls we get.
-
Volume and mute. Turn the volume up a little, and make sure the MUTING or audio-muting switch is off.
-
The input selector. Is it set to the input your source is actually plugged into?
-
Tape Monitor. If a TAPE MONITOR button is pressed in, you’ll hear the (silent) tape input instead of your source. A home-theatre installer writing in Sound & Vision joked that if he had a nickel for every Tape Monitor “problem” he’d fixed, he could buy lunch. Unless you’re using a tape deck, keep it off.
-
The speaker selector. Is it set to the pair your speakers are connected to, and not OFF?
-
Headphones. Unplug them.
-
Pre Out / Main In jumpers. If your amp has them, are they in place?
-
The speaker wires. Firmly connected at both ends, with no stray strands?
-
The relay. Did you wait for the click a few seconds after switching on?
Still nothing? Switch off and contact us before you try anything else.
Sound cuts out, crackles or drops a channel
The most common cause of sound cutting in and out on a vintage receiver is a dirty Tape Monitor switch, followed by a dirty input selector. With the volume low, press the Tape Monitor button in and out a few times, and work the input selector back and forth. If that clears it, it will come back, so book a cleaning. Either way, don’t keep playing music through a channel that crackles or cuts out: it can damage your speakers.
Only one side in your headphones?
If the plug never went fully in, or went in with the volume up, the jack or the headphone circuit may have been shorted. Try the headphones on another source to rule them out, then contact us rather than testing it again and again.
It shuts off, cuts out or won’t stay on
Switch it off, then check for a stray strand at the speaker terminals, a pair of low-impedance speakers on A and B together, or blocked vents. If it started after a power outage, a surge or a static shock, unplug the receiver from the wall for at least 48 hours before you try again: for some types of protection circuit, that alone gets it behaving normally. If it still cuts out, contact us.
Hum or buzz
- Only on PHONO? Check the turntable’s ground wire (see Connecting your sources).
- On every input? Make sure every RCA plug is pushed all the way in, plug everything into the same power bar, and route signal cables away from power cords.
- Never defeat the ground pin on a power cord to cure hum. It’s dangerous. Call us instead.
Stop, switch off and unplug right away if you notice
- a burning smell or smoke
- a loud bang, or a fuse that blows
- a thump or hum from a speaker with nothing playing
- sound that’s distorted at every volume
- any liquid spilled on or into it
Please don’t open the case. There are dangerous voltages inside, and manufacturers warn that it is very dangerous to touch the inside of the unit. That’s exactly what our bench and our warranty are for.
Moving, shipping and storing it
Switch off and unplug everything first, then give it a few minutes to cool.
Lift by the chassis, never by the knobs, faceplate or dial glass
Most of a receiver’s weight is in its transformer, so one side is heavier than the other. Big receivers can weigh 40 lb or more; lift those with two people.
Keep it flat and upright
Never stand it on its face or its back, and wedge it so it can’t slide. In winter, carry it in the car, not the trunk, and let it warm up indoors before you plug it in.
Shipping it?
Use a sturdy 275 lb test double-wall box with at least two inches of firm padding on every side. Ask us how we do it; we’ve shipped many hundreds of vintage components across Canada and around the world.
Storing it?
Keep it indoors, in a dry room with a steady temperature: not a garage, shed, attic or damp basement. Cover it with a cotton sheet rather than plastic, which traps moisture. If it’s been stored for years, it’s worth a check on our bench before you play it hard again.
Service, restoration and your warranty
What our bench already did
Every receiver and amplifier we sell is bench-tested, and serviced if it needs it, before it’s listed. Our service levels describe how much work a unit needed to reach our standard, not how good it is: every unit leaves the bench meeting the same standard, however much work it took to get there.
When it needs more than care
We service vintage receivers and amplifiers, including units you didn’t buy from us. We charge a bench fee at intake, sized to the job and credited to the repair. See our Audio Service page or request a quote.
Upgrades while it’s with us
Beyond repairs, we can re-lamp it with LEDs (see Lamps and lights), and dress many receivers in Ottawa Valley cherry, from new side panels to a full cabinet; see Ottawa Valley Cherry Cabinetry.
Your Bumper-to-Bumper Warranty
Every used and vintage receiver and amplifier we sell, except as-is units, carries our 90-day Bumper-to-Bumper Warranty. If it fails in normal use within 90 days, we repair or replace it at our expense and start you on a fresh 90 days. Normal use is everyday listening, not a lightning strike, a hot-plug mishap, a coffee incident or an encounter with gravity, which is one more reason the habits in this guide matter. If a component has to come back to us under warranty, you ship it to us and we ship it back; if it arrives dead, we cover the return shipping in full.
Make it last: add an Extended Warranty
On used and vintage components over $500, you can extend your coverage by one, two or three years, at 15% of the listed price per year. On a $1,000 receiver, that’s $150 for one year, $300 for two or $450 for three. It starts when your 90 days end, it can be transferred once to a new owner (a real selling point if you ever sell), and repairs under it add a complimentary 90-day extension. It must be added within your first 90 days. After that, it takes a $95 bench inspection first. Email sales@radique.com to add one.
Picking up in person?
Let us set it up and play it for you before it goes home, so you see and hear it working.
Bought in person or on Kijiji, Facebook Marketplace or Canuck Audio Mart?
Send one email to sales@radique.com with your name and contact details, the date and where you bought it, and the component’s make and model. That registers you for both your warranty and the Trade-Back. Orders placed on radique.com are already on file.
Your next step up
Trade up any time with our Perpetual Trade-Back
Your receiver isn’t a one-way decision. Trade it back to us any time for store credit toward other used or vintage gear: 100% of what you paid within 30 days, 80% up to six months, 70% to a year, 60% to two years, and 50% after that, for as long as you own it. The credit never expires. See the Perpetual Trade-Back Program.
Complete the system
A great receiver deserves great sources. Browse our turntables (and our custom restorations and builds), cassette decks, CD players and tuners, and of course speakers and subwoofers. Ready for more power? See our stereo receivers, integrated amplifiers and power amplifiers.
Waiting for a particular model?
Join the First Dibs list for it and we’ll let you know when one comes in.
Spread the cost
Cue It Up layaway lets you reserve a piece and pay it off over time.
Watch and learn
Prefer to watch? Mark and La-Donna cover a lot of this on the Radique Audio YouTube channel.
Setting up
- What Order Do You Turn On Stereo Equipment? (Audio Tip #7): connect with everything off, then power up in the right order.
- Stream Bluetooth to Your Vintage Stereo (Easy Setup): the RA-Twin II on a vintage receiver.
- How Do You Add a Subwoofer to an Amp With No Sub Out? (Audio Tip #8): speaker-level connections for vintage amps.
Getting the sound right
- What Does the Loudness Button Do? (Audio Tip #5): why bass seems to vanish at low volume.
- Is a Louder Speaker a Better Speaker? (The Loudness Trap): why louder fools our ears into hearing “better”.
Cabinets, unboxing and how we pack
- Custom WC-22 Style Cherrywood Cabinet for Marantz 22xx Series, Full Install
- Pioneer SX-580 Unboxing: see how a vintage receiver from us arrives.
- Special Delivery! Unboxing a Baby Marantz 2010
Subscribe so you don’t miss the next one.
Stream Bluetooth to Your Vintage Stereo (Easy Setup): the RA-Twin II on a vintage receiver.
Vintage receiver questions we hear most
Does a vintage receiver need to be recapped?
Not just because of its age. We replace capacitors when a unit needs them, and our full restoration includes a complete re-cap (service levels). A receiver that tested well on our bench and plays cleanly can go on for years. If it starts to hum more, take longer to click on, or distort, let us look at it.
How many watts does a vintage system need?
Fewer than you’d think, if your speakers are efficient. What matters is that you never push the receiver into distortion to get the volume you want. If you often find yourself near that point, you need more efficient speakers or a more powerful amplifier. Tell us your speakers and your room and we’ll help you match them.
Will 4-ohm speakers work with a vintage receiver?
Check the rating printed by the speaker terminals. Many vintage receivers accept 4-ohm speakers on one pair (A or B) but want 8 ohms per speaker when A and B play together. If it says 8 ohms minimum, stick to 8-ohm speakers.
Can two pairs of speakers play at once?
Yes, with A and B, if both pairs are 8 ohms (or your receiver says it can handle less). Playing both pairs at once roughly halves the impedance the amplifier sees, so it works harder and runs hotter.
Why is there no sound?
Nine times out of ten it’s the Tape Monitor button, the speaker selector, the input selector or missing Pre Out/Main In jumpers. See No sound? above.
Why does it click a few seconds after switching on?
That’s the protection relay connecting your speakers once the amplifier has settled. It’s normal and it’s protecting your speakers.
Why does one channel crackle or cut out?
Usually a dirty switch or control, most often the Tape Monitor or the input selector. It’s a cleaning job for our bench, not a sign the receiver is failing. Turn it down and contact us; don’t keep playing through a crackling channel.
Will a TV connect to a vintage receiver?
A vintage receiver has no digital or HDMI inputs. If your TV has an analog audio output (RCA jacks or a 3.5 mm headphone jack), connect it to AUX with a Gold Series cable. If it only has an optical output, you’ll need a small digital-to-analog converter in between.
Can a vintage receiver stream music?
Yes. An RA-Twin II adds Bluetooth to any vintage receiver in a couple of minutes, from $39. A streamer or DAC with RCA outputs works too, into any line input.
Can a subwoofer be added?
Yes, even without a sub output. See Adding a subwoofer above and our subwoofer care guide.
Is it better to leave it on all the time?
No. Switch it off when you’re done listening. It saves the lamps and keeps the parts inside cooler, and switching on and off once or twice a day does no harm.
It gets warm. Is that normal?
Yes. Most vintage amplifiers run warm even when idling. If the top gets too hot to keep your hand on, switch it off, check that nothing is blocking the vents, and contact us.
Can you change the lamps to LEDs, or to a different colour?
Yes: a full LED re-lamp is $95 plus HST, and a custom colour combination is $145 plus HST. See Lamps and lights.
Do you sell replacement knobs, lamps or other parts?
We don’t sell parts, but our bench can do the work for you. Contact us with your model and what’s missing.
The dial doesn’t line up exactly with the station. Is something wrong?
No. On a mechanical dial, a fraction of a degree off is normal; we pass an FM tuner when the pointer reads within half a megahertz of the station. Tune by ear or by the signal meter.
The headphone plug won’t go all the way in.
Turn the volume to zero first. Vintage Marantz jacks are snug, so one firm, straight push often seats it. If it still stops part way, take it out and check you have a ¼-inch stereo plug or a well-made adapter. Never play it part way in: a half-seated plug can short the headphone jack and knock out a channel. If a good plug won’t seat fully, contact us.
The turntable hums.
Connect its ground wire to the GND screw on the receiver, and make sure it’s plugged into PHONO, not a line input (unless it has a built-in phono preamp). Our turntable care guide has more.
Is a closed cabinet OK for a receiver?
An open shelf is best. If it has to go in a cabinet, leave several inches above and behind it, take the back off or leave the door open while it plays, and never stack anything on top.
Is there a wood case for this receiver?
For many models, yes. Our master woodworker builds WC-22 style and WC-10 style cherry cabinets for Marantz receivers, and can dress many other components in cherry. See Ottawa Valley Cherry Cabinetry.
What does the warranty cover, and can it be extended?
Our 90-day Bumper-to-Bumper Warranty covers failures in normal use. On components over $500 you can add one, two or three years, at 15% of the listed price per year, within your first 90 days.
Can it be traded in later for something better?
Yes, any time, through our Perpetual Trade-Back Program: from 100% of what you paid in the first 30 days down to 50% after two years, as store credit that never expires.
Questions, odd noises, or want a hand setting it up?
Email us at sales@radique.com. We’re happy to help, and we’d much rather hear from you early.
More from Radique: caring for your subwoofer · caring for your turntable · cherrywood cabinet care · service levels · audio service · Warranty FAQ